If you’re getting roof quotes and “ice and water shield” shows up as a line item, you might be wondering whether it’s actually necessary or just something contractors tack on to pad the invoice. Fair question. Short answer: it’s not padding. It’s the one layer standing between your roof deck and the kind of leak that shows up as a stain on your ceiling eighteen months later.
Long answer takes a bit more explaining, so here it is.

What Is Ice and Water Shield?
Ice and water shield is a self-adhering, rubberized-asphalt membrane that gets rolled directly onto the roof deck before shingles go on. The part that matters: it’s waterproof, not water-resistant. Felt paper and synthetic underlayment shed most water most of the time. Ice and water shield blocks it completely, and it self-seals around fasteners.
That self-sealing property is the whole point. When a roofing nail punctures the membrane, the rubberized asphalt grips the nail shank and forms a gasket around it, so water can’t wick down the shaft into the decking. Compare that to synthetic underlayment or old #15 felt, where every nail hole is a potential leak path that just sits there waiting for the right storm.
Think of your roof in layers. Shingles are the first line of defense. Underlayment is the second. Across most of the field area, synthetic underlayment handles that job fine on its own. But at the eaves, in the valleys, and around anything that punches through the roof deck, you need something that doesn’t just resist water. You need something that stops it cold.
Ice dams are the classic failure mode this product exists to prevent. Snow melts on the warmer upper roof, runs down to the cold eave overhang, and refreezes there, building a dam. Water backs up behind it with nowhere to go but under your shingles. Without ice and water shield, that water hits felt or synthetic underlayment and finds its way through nail holes and seams straight into your roof decking. We’ve torn off roofs where the decking was black with rot in a perfect line right at the eave, three or four feet up. Every time, no ice and water shield down there.
Where Does Ice and Water Shield Go on a Roof?
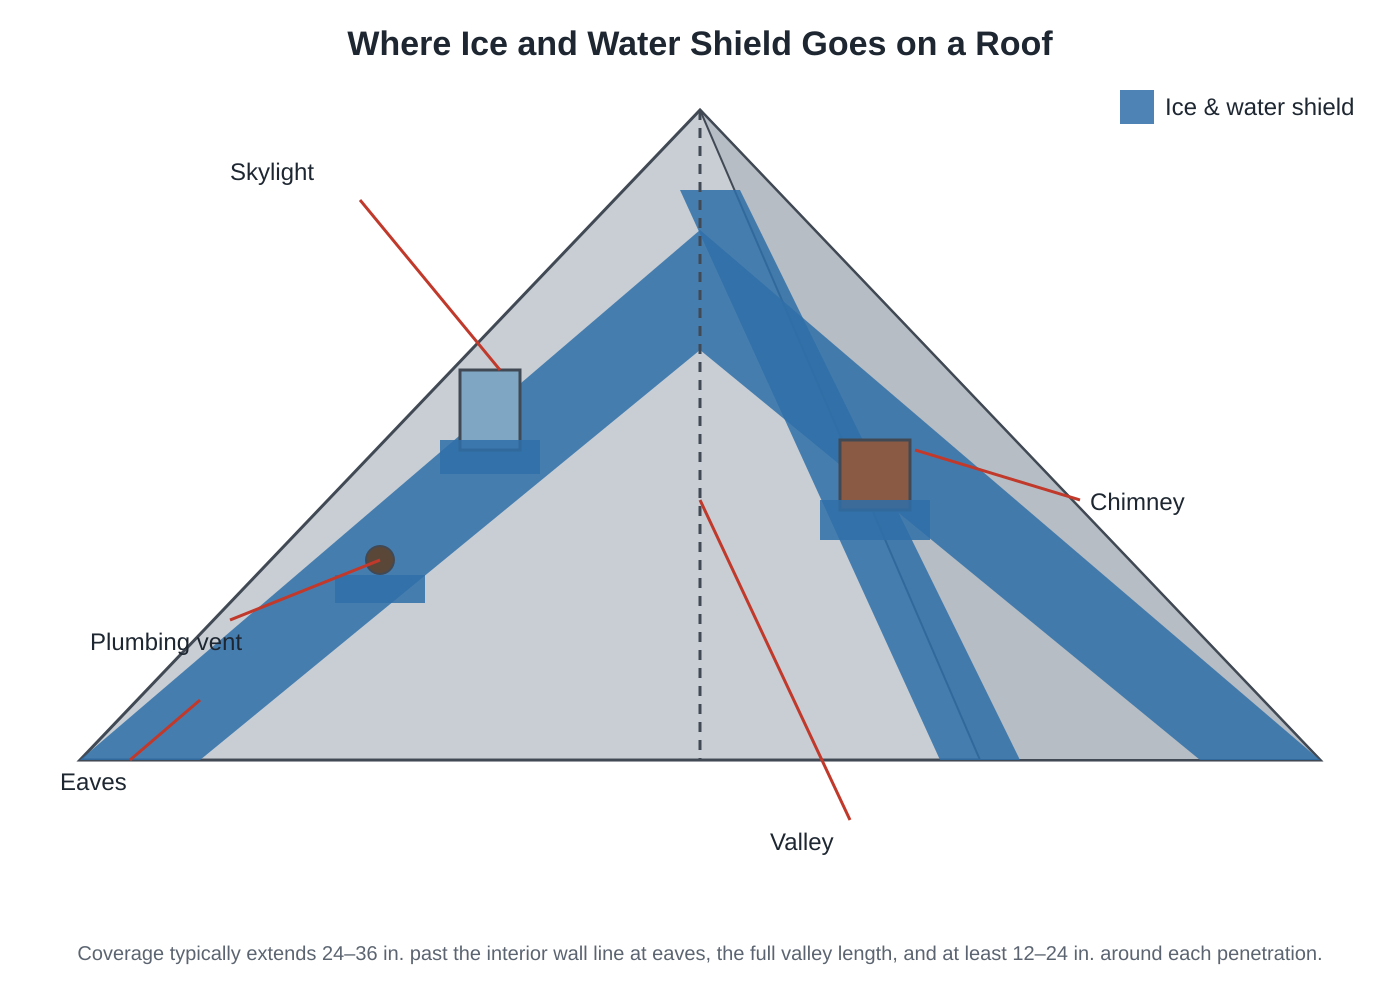
Three spots, in roughly the order of how much I’d argue about each one.
Eaves and roof edges
Non-negotiable. Building code requires it in most cold-climate jurisdictions, extending from the roof edge to at least 24 inches inside the exterior wall line. On most homes that works out to roughly 3 to 6 feet up from the eave. We typically run it a full 6 feet, because the code minimum isn’t always enough, especially on lower-slope sections where meltwater has more time to travel before it refreezes.
Valleys
Every valley is a water highway. Two roof planes meet, and all that runoff concentrates into a narrow channel that moves a lot more volume than the surrounding field. Full-width ice and water shield down every valley is standard practice at this point. If a contractor quotes a roof without valley membrane, that’s a red flag worth asking about directly.
Roof penetrations and skylights
Chimneys, plumbing vents, skylights, dormers. Proper flashing paired with ice and water shield at these spots matters because water finds them before it finds anywhere else. Low-slope sections and dead valleys (the awkward spots where a lower roof meets a wall) belong in this same category. They collect debris, hold water longer than a normal pitched surface, and account for a disproportionate share of leaks on roofs that are otherwise in good shape.
Does ice and water shield go over or under the underlayment?
Ice and water shield goes down first, directly on the deck, at the vulnerable spots above. Synthetic underlayment then covers the remaining field area, overlapping onto the ice and water shield edges rather than the other way around. They’re sequenced, not stacked randomly, and they’re not interchangeable products doing the same job twice.
Can You Install Ice and Water Shield on the Entire Roof?
You can, and some contractors do it as a matter of course. We’ve done full-deck coverage on flat and very low-slope sections, where it makes sense. On a standard residential roof with normal slope, though, we usually steer people away from it. The membrane has very low vapor permeability, under 0.5 perms, so covering every square inch can trap moisture in the attic if the ventilation isn’t dialed in. Targeted installation at the vulnerable spots above is the better call for most homes. Full-deck coverage sounds like the safer, more-is-better choice, but on a standard-slope roof it usually just trades a leak risk you can manage for a moisture problem you can’t see coming.
Is Ice and Water Shield a Vapor Barrier?
Functionally, yes, and that’s exactly why full-deck coverage is worth thinking twice about. At under 0.5 perms it behaves like a vapor barrier wherever it’s installed. In a targeted application at eaves, valleys, and penetrations, that’s a non-issue since it’s a small fraction of total roof area. Run it across the whole deck on a roof with marginal attic ventilation and you can end up trapping moisture that would otherwise escape, which shows up later as sheathing or insulation problems that have nothing to do with the roof leaking.
How Long Does Ice and Water Shield Last?
Once it’s under shingles, UV exposure basically stops being a factor, so degradation slows way down. On tear-offs we regularly find 20-year-old ice and water shield that’s still bonded and doing its job. For a number you can actually hold a manufacturer to: GAF backs its WeatherWatch ice and water leak barrier with warranty coverage up to Lifetime when it’s installed as part of a qualifying GAF Lifetime Shingle system, or up to 25 years on a non-Lifetime system. That’s a warranty figure, not a claim about the membrane physically wearing out on a fixed schedule, but it’s the closest thing to a hard number a manufacturer will put its name on.
Brand Comparisons From Someone Who’s Installed All of Them
We’re GAF Master Elite certified, so GAF StormGuard is what we spec on most projects. But we’ve installed all the major products over the years, and here’s how they actually stack up once you’re the one handling them on a roof instead of reading about them on a spec sheet.
Grace Ice & Water Shield (now under GCP Applied Technologies) is the original, and honestly it’s still the one I’d point to if price weren’t a factor. GCP basically invented this product category: double-layer rubberized asphalt, polyethylene film surface, the Ripcord release liner for positioning, and it’s the only one on the market with an independent fire rating. Contractors who’ve been doing this for decades tend to have strong feelings about Grace, and almost all of those feelings are positive. The catch is cost, $1.10 to $1.75 per square foot for material alone, and availability. It’s not always sitting on the shelf at the local supply house; sometimes it gets special-ordered, which adds a day or two to a schedule that’s already tight.
GAF StormGuard is our workhorse. Film-surfaced, self-adhering, a strong seal around fasteners, and it integrates with GAF’s warranty system, which matters a lot on Golden Pledge installations where every component has to stay inside the GAF ecosystem or the warranty gets messy. Performance is comparable to Grace for residential work. We haven’t had a StormGuard failure that I can point to.
Owens Corning WeatherLock tears less during installation, which crews notice on roofs with a lot of hips and valleys. CertainTeed WinterGuard comes in sand-surface and granular-surface versions, the granular gives better footing on steep pitches, a detail that matters more than you’d think at 7am on a dewy October roof, and their HT version handles temperatures up to 250°F for metal roof applications.
For a homeowner comparing quotes: brand differences here are smaller than installation quality differences. A perfectly installed CertainTeed product beats a poorly installed Grace product every single time. What actually matters is whether the crew follows manufacturer overlap specs (6-inch side laps, 4-inch end laps minimum), whether they’re applying to clean dry decking, and whether they’re covering every vulnerable spot instead of stopping at the eaves because that’s the part code inspectors check.
| Property | Ice and Water Shield | Synthetic Underlayment |
|---|---|---|
| Waterproof? | Yes, completely | No, water-resistant only |
| Self-sealing around nails? | Yes | No |
| How it attaches | Peel-and-stick adhesive | Stapled or cap-nailed |
| Vapor permeability | Very low (<0.5 perms) | Higher, breathable |
| Cost | $0.50-$1.75/sq ft material | $0.10-$0.25/sq ft material |
| Where it goes | Eaves, valleys, penetrations | Field of the roof |
People mix these two up constantly, but a properly built roof needs both, doing different jobs. We still run into contractors using #15 or #30 felt as field underlayment, which, fine, it’s been working for a hundred years and it’s not automatically a dealbreaker. Synthetic is lighter, lays flatter, and doesn’t wrinkle or tear if shingles don’t go on the same day. Price difference across a full roof is minimal, so if someone’s quoting felt in 2026 it’s at least worth asking why.
Do You Need It?
Probably, and the code question is more tangled than most homeowners expect. The International Residential Code, at section R905.1.2, requires an ice barrier extending from the lowest roof edge to at least 24 inches inside the exterior wall line in regions with a history of ice-dam backup; and on roofs pitched 8:12 or steeper it must also reach at least 36 inches measured along the roof slope from the eave edge, whichever ends up farther up the roof. Whether that requirement actually applies to your address depends on which edition of the code your town adopted and how the local average January temperature gets calculated, and it genuinely varies block to block in some counties.
Multiple municipalities in our service area have amended local code to say ice barrier underlayment isn’t required, citing winter design temperatures that sit just above the threshold in the code. Which is a little odd, because we’ve pulled ice-damaged decking off homes in those exact towns. Code is the floor here, not the ceiling. A climate where temperatures swing above and below freezing forty or fifty times a winter creates textbook ice dam conditions whether or not the average January reading technically clears the threshold by a degree. We install ice and water shield on every roof we do, code minimum or not. It adds a few hundred dollars to a job that already costs thousands, and the protection-to-cost ratio isn’t close.
Two more things worth checking on your own: some homeowners insurance policies factor in whether ice and water shield was installed, so it’s worth a call to your provider. And GAF, Owens Corning, and CertainTeed all require it at eaves and valleys to qualify for their enhanced warranty programs. Skip it, and you can void the best parts of your shingle warranty without realizing it until you actually need to file a claim.
What It Costs
These numbers are rougher than I’d like because material pricing swings by brand and by what the local supply house has on the shelf that week, but here’s the general range. Material runs $0.50 to $1.75 per square foot depending on brand, Grace sitting at the top. A typical home needs roughly 5 to 8 squares of coverage at the eaves, valleys, and penetrations, so material cost alone lands somewhere around $250 to $1,400. Labor usually gets bundled into the full roof installation rather than broken out as its own line item. As part of a full roof replacement, the added cost for proper ice and water shield typically runs $300 to $800 total, a small fraction of a $15,000-$25,000 project for the component that prevents the most common type of leak in this climate.
Material costs jumped in 2022-2023 and have mostly leveled off since.
Installation Details Most People Skip Over
Temperature matters more than most product brochures let on. Below about 40°F the adhesive on most products gets sluggish and won’t bond properly to the decking. We’ve seen crews install it on cold mornings and end up with bubbles and lifted edges by spring. GAF StormGuard specs a minimum application temperature of 40°F and we hold to it, even when that means waiting a few hours for the deck to warm up before we can start.
Wrinkles become permanent the moment the adhesive grabs. There’s no repositioning after that. Grace’s Ripcord system helps with alignment during install, but it’s still a one-shot deal, so experienced crews work in short sections and keep the release liner on until the last possible moment. Sawdust, frost, or morning dew on the plywood compromises the bond too, and you’ll never see the difference from the ground. You’ll feel it years later when a ceiling stain shows up out of nowhere.
One thing nobody warns you about: wasps love the warmth that dark ice and water shield absorbs in summer. We’ve pulled ridge caps off during re-roofing jobs and found wasp nests built right against the exposed membrane at the ridge. Not a performance issue, just something a crew deals with in August and nobody puts in the brochure.
Frequently Asked Questions
Where does ice and water shield go on a roof?
At the eaves (roughly 3-6 feet up from the edge), down every valley at full width, and around any penetration, chimneys, skylights, vents, dormers. On low-slope sections it can cover the whole deck.
Is ice and water shield a vapor barrier?
Functionally, yes, at under 0.5 perms. That’s fine in a targeted install and worth watching on full-deck coverage if attic ventilation isn’t great.
How long does ice and water shield last?
Essentially the life of the roof system above it once it’s covered by shingles and out of the UV. GAF’s own WeatherWatch warranty runs up to Lifetime on a qualifying GAF system, or 25 years otherwise.
Does ice and water shield go over underlayment?
No, the sequence runs the other way. Ice and water shield goes down on the bare deck first at the vulnerable spots, and the synthetic underlayment for the field of the roof overlaps onto its edges afterward.
What is ice and water shield on a roof?
A self-adhering, waterproof rubberized-asphalt membrane installed at the roof’s most leak-prone spots before shingles go on.
Does ice and water shield go over or under the drip edge?
This one still generates surprisingly heated debate among roofers, for what’s ultimately a small detail. Code and most manufacturer specs agree on the sequence, even if not every crew follows it: at the eave, the drip edge goes on the deck first and the ice and water shield laps over it, so water running down the membrane drains onto the drip edge and into the gutter. At the rake, the sloped edge, the order flips. Underlayment goes down first, and the drip edge installs over it. The goal either way is directing water into the gutter, not behind it.
Can I install ice and water shield myself?
Technically, but I wouldn’t. The product doesn’t forgive mistakes and you’re working on a roof. Whatever you save on material cost doesn’t offset the risk of a bad install that fails silently for years before it shows up as water damage on your ceiling.
If you’re planning a roof replacement and want a straight answer on what your home actually needs, request a quote and we’ll look at your roof’s layout, your local code requirements, and tell you exactly where ice and water shield belongs on the project. For how this membrane fits with everything else on the roof, see our roofing materials guide.